

Introduction:
Table of Contents (TOC) could be added to your word document either manually or automatically. However, the automatic method is more efficient and recommended, especially when your document has many pages, as it makes the update of the TOC easier. To make use of this method, some initial setups need to be done in your document.
It is essential to note that we will be working with a 5-page document named “Sample” in this exercise. The first page in our sample document will be the title page; second page will be for Table of Contents; third page will be for Introduction; fourth page will be for the main body; and the fifth page will be for Conclusion.
Initial Setup for enabling automatic TOC:
At this setup stage, we will have to modify the style of Heading 1 (which we will be using as our main heading style). Note that if you have subheadings which you also plan to add to TOC in your document, then, you can modify the style of Heading 2 as well.
In the sample document for this exercise, we only have main headings, so, we will only be modifying Heading 1 by changing the font colour, type, size, among others.
Modifying the style of “Heading 1”:
- Click on ‘Home’ tab from the menu bar
- Right-click on ‘Heading 1’, and then, click on Modify (as in Figure 1)

Figure 1
- In the dialog box that is displayed, depending on your preferences, you can select ‘Times New Roman’ as the font type; select 14 as the font size; click the bold icon (B); and select black colour as the font colour; click on center alignment icon; click on the double-line spacing icon, and then click on ‘OK’ (as in Figure 2).

The style for “Heading 1” is now modified successfully.
Next, we will highlight each of the main headings in our document (that is, Table of Contents, Introduction, Main body, Conclusion) and then click on “Heading 1” to assign the style to them accordingly.
For example, on the page for "Table of Contents", highlight the heading, and then click on “Heading 1” style (as in Figure 3). The style is now applied to the main heading. Note that we are to assign the ‘Heading 1’ style to all the other main headings as well.

Figure 3
Next, we will do the same for the next main heading (that is, "Introduction"), as in Figure 4.

Next, assign the “Heading 1” style to the other two main headings as well.
That’s what we have to do at the initial setup stage
Inserting the TOC automatically:
Now that we have assigned ‘Heading 1’ style to all our main headings, we can move to the page for our Table of Contents (as in Figure 5) and continue with the other tasks.

Figure 5
- Next, click on ‘References’ from the menu bar >> click on ‘Table of Contents’ >> click on ‘Custom Table of Contents’ (as in Figure 6).

In the dialog box that appears, click on ‘Modify’ (as in Figure 7).

- In the ‘Styles’ dialog box that appears next, click on ‘Modify’ with TOC1 selected by default.
- Next, in the “Modify Style” dialog box, depending on your preference, select ‘Times New Roman’ as font type, ’12’ as font size, and click on the icon for 1.5 line spacing, and then click on ‘OK’ (as in Figure 8). The font modifications will be applied to every content that is a main heading (and they are tagged as TOC 1) on the page for your TOC.

Figure 8
- After clicking ‘OK’, the ‘Modify Style’ dialog box will disappear. For the 'Style' dialog box, also click on "OK".
We are now left with the first dialog box (Table of Contents). On the dialog box, if you do not want the Tab leader (that is, the dots that link the contents to the page number) to appear on your TOC page, you can select "none". However, in this exercise, we will leave it as default because we want the Tab leader to appear. We can now click on "OK" as in Figure 9.

Figure 9
- After clicking on ‘OK’, the Table of Contents will then be automatically added to the page (as in Figure 10).

Updating the page for Table of Contents:
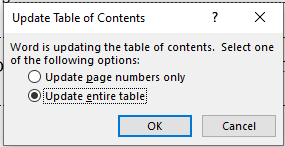
To automatically update the contents of your Table of Contents whenever you make changes to your document, what you have to do is to simply click on the ‘References’ tab from the menu bar, and then click on ‘Update Table’ (as in Figure 11). Next, in the dialog box that appears, you can choose ‘Update entire table’ and then click on ‘OK’ as in Figure 12.

Figure 11
The TOC has now been automatically updated as in Figure 13.

Figure 13
Note that an alternative method of updating the TOC is to go to the TOC page, right-click on any part of the Table of Contents, and then click on “Update Field” as in Figure 14.

Figure 14
Thereafter, you can select “Update entire table” and then click on “OK”.
Conclusion:
You have now learned how to automatically insert and update Table of Contents in your Microsoft Word document. Note that if you add more main headings (or subheadings- as the case may be) to your document, you have to ensure that they are highlighted and assigned the ‘Heading 1’ style (or Heading 2 style for subheadings) that you have already modified from the “Styles” group in the Home menu ribbon. Thereafter, you can then update the TOC.
For more efficient methods of working with Microsoft Word Document, check out my book titled “Good Practices in Preparing Your Microsoft Word Document” on Amazon.
Thank you for reading.
Comments
Post a Comment